Dollar Crunching Is A Pain. But it does make one stop and think. I have gotten into the bad habit of buying premade food or Pizza already made or Mac & Cheese from the freezer section. But I forced myself to back up and start with the basics again. Plan a menu, write up a grocery list, shop from list without extras (as much as possible). One of my meals is Tostada Casserole! Yummmmmm. I will have to add the recipe in here :)
Tostada Casserole:
1.5 lb Ground Beef
1 - 15oz Can (2C) Tomato Sauce
1 envelope Taco Seasoning Mix
2.5 C Plain Doritos
1 - 15oz Can Refried Beans
8oz Shredded Cheddar Cheese
In Skillet, Brown Ground Beef. Add 1.5C Tomato Sauce and Taco Mix and mix well. Crumble 2C plain doritos and put in the bottom of a lightly greased rectangle baking dish. Spoon the meat mixture over the chips. Combine remaining tomato sauce and beans. Spread over Meat mixture. Bake 375 for 25 minutes or until mixture is heated. Sprinkle with cheese and the rest of the crushed chips. Bake 5 minutes more.
*** I have to tell my shortcuts. I use homemade salsa instead of the tomato sauce and sometimes eliminate the taco mix altogether (especially if the salsa is HOT) I also just mix all the ingredients into a large bowl and after well mixed, put into the baking dish and bake. We also use the remaining chips in the bag as utinsils. :) cuts down on that dishwashing!!
YUMMMMMMY This is really good as leftovers!! and it freezes wonderfully.
________________________________
Concerning the Dissapearing 9-Patch quilt, I have finished the top.. YEAH !!! I mulled over how to quilt it, whether to machine quilt it, hand quilt it or tie it. Hand quilting is out, takes to long, really wanted to machine quilt it, but I'm not very good at it, but I finally decided to give Machine Quilting a try. (I've not done this much, which is why I have so many tops, but not any quilts :( ..)
I don't have a good place at home to lay it out and sandwich the quilt together, I thought I would try to do it at work!! WOW That was interesting! I will have to do this again. I really enjoyed working on it this way when it was all spread out over 3 tables and could see the whole quilt!! 

Now I am trying to machine quilt it :) I hope this turns out, because it is a gift for a friend. I have quilted a diagonal line across half of the quilt and am trying to get the other half quilted. After that, I have to do the diagonals the other direction. At that point, I will spread it out over my bed and see if it needs any other quilting.
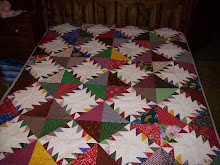
 Here is the top with the diagonals all going one way.
I will post a pic after the two diagonals are stitched and ask opinions!
 It is hard to see, but I have the diagonals going both ways now, but I can see that there is still a huge area left without any quilting. That is not good. Trying to figure out what I can put in there that is quick.
I figured out what to put in the center. I REALLY wanted to put a circle, but that is still beyond me. Basically this represents X's and O's.. Hugs and Kisses :) Which ties into the back. It has one word. Believe.
This is for my friend Kathy B. who is fighting cancer.

Just another view. Farther away and shows the block well, I think

Here it is. Folded in half, but you can see the quilting in the center and what the borders look like. This is my first time working with stripes. I have seen this done in magazines and on other quilts and have wanted to try it out!
Now, I need to re-pin and smooth out wrinkles and figure out what to do for the borders.
Very frustrating. I thought quilting in the ditch around the striped border would be easy. Nope, I've had to manipulate the fabric so that it all doesn't bunch where the diagonal quilting meets the border. Sometimes not very successfully. :( I hope this gets lost in the wash. I need to go do something else, my back is hurting from hunching over to focus on the stitches. Boy, I wish I could just snap my fingers and have it all quilted!!
Ok, quilting is all done!! Yipee!!! I'm wiped out. Here is a pic, not sure if the quilting that I did for the border shows up. I just quilted curves. I had planned on quilting the curves around the flow of the flowers but the curves were too tight for me to do so I just elongated the curves. Good that the busy fabric hides it some, bad because the picture doesn't show up. lol
 I started to baste around the edge of the quilt, but gave it up. What a pain. Now I need to figure out how wide to cut the strips for the binding. Off to search the web or pick somebodies brain!!
 Guess you can see the quilting :) yeah!!
I love adding pictures, I figure this is a great diary of what all I have done. And close up pictures really will help later on, when I have forgotten what I did!